ROBOT CRAFTING
ROBOT CRAFTING
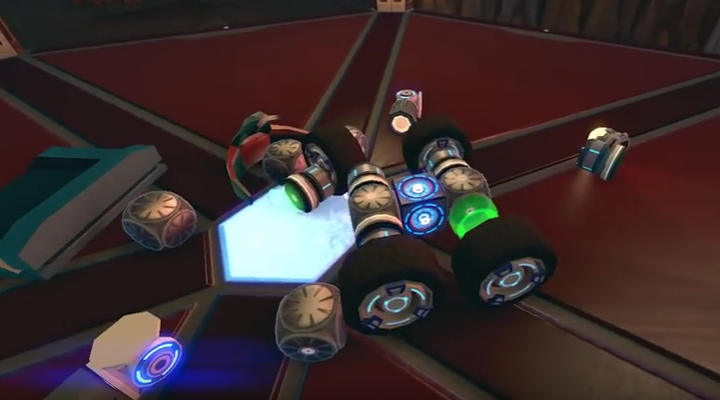
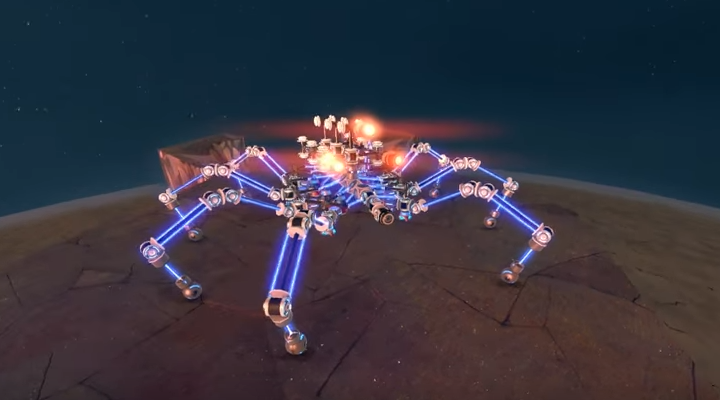
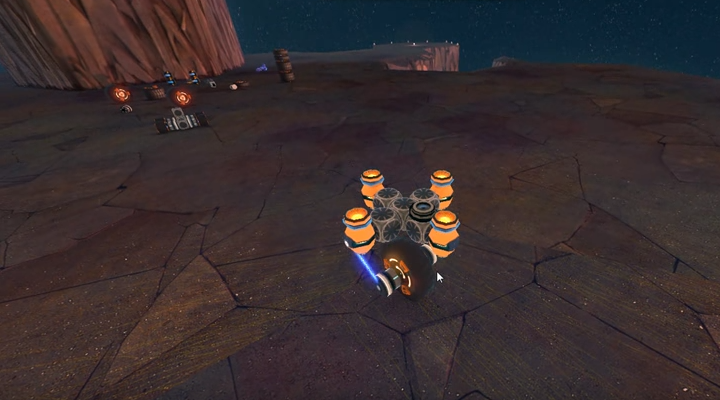
Like Lego Mindstorms, simple building blocks allow the player to create all kinds of bots. Motors, sensors, tools and structural body parts seamlessly connect with one another. Each and every bot part hides a world of options ready to be discovered. Building blocks are designed to be combined in ways even the developers didn't think about.
VISUAL PROGRAMMING
EVERYTHING IS PROGRAMMABLE
With an intuitive and streamlined graph system that brings the power of visual programming into the hands of creative minds.

FOR THOSE OF YOU WHO KNOW WHAT IT MEANS
Our craft system is Turing Complete. The logic is developed with Mono, C # and F #, using functional programming patterns.
We offer our thanks to all the developers who made these technologies possible.
SANDBOX

Rawbots is a multiverse game, where each player is the master of his own universe (Universe Master), which he can choose to abandon, or evolve.
Each Universe has a set of default rules that can be re-programmed, like gravity, day/night cycles, planets atmosphere and landscape. Each Universe has a default contract that every visitor needs to voluntarily accept before visiting.
Contracts are used by Universe Masters to provide the framework of their Universe. Contracts can contain anything from bartering rules, to fighting, to peacemaking. Engineers that only wish to design and build bots in cooperation with others, without the threat of outsiders, can do so with contracts.
Robot fighting competitions, board games, rpg campaigns and other game mechanics can also be enforced by contracts. A few default contracts will be included to help players hit the ground running. But Universe Masters will have full power to re-imagine their own society. Teslight Corp is the creator and controller of multiverse transportation technology.
A Universe has planets and each planet can have water, caverns, continents and floating islands. You can build bots that can go underwater, drive over land, hover and travel between planets.

Robot crafting is at the center of the experience. Every experience thereafter is pure emergence. We will provide the foundations and building blocks that will allow infinite possibilities. FPS, CTF, RTS and other gameplay styles will all be possible, through creative use of building blocks, visual programming and general game rules.
The crafting system is composed of a physical component (bot parts) and a virtual component (programming operands). A signal processing system connects and powers everything. The design of the crafting system is based on sophisticated category theory and reductionism principals.
This philosophy allows us to focus on developing simple atomic building blocks that can be combined in ways we could never imagine, creating genuine beautiful complexity, and true emergence that is bigger than the sum of its parts.

The economy system is fundamentally bartering.
However, all the tools will be provided for Universe Masters to build their own exchange and banking systems.
If a currency evolves in a Universe, it will be out of pure emergence (or contractual).
Players can choose to exchange blueprints, bot parts, services or data, where data can be a custom currency.


GAME CONTROLS
GAME CONTROLS
Rawbots has its own special ways of how things work, therefore it isn't that easy to find out all about these features on your own. This page should explain them all very detailed. There are a couple of things to get familiar with, but it's not hard to master them and the devs still do their best to improve the userfriendliness in further releases.
All known controls since blueshift 0.1.X
Hold F1 ingame to show a table with some basic controls. It also contains a link to the Quick Reference Board of the Official Rawbots Website.
At the moment there are two main view modes in Rawbots:
→ The basic world view, where you can build your bots and do some terraforming.
→ The console, where you can access the system commands and do the visual programming.
View Controls
There are two view modes: 1st person mode views the world through a camera part and 3st person mode rotates the view arround a focused bot part.
Use the Arrow Keys, to rotate the view arround the focused part:
LeftShift + Up/Down-Arrows to zoom in/out
Tab + LMB (left-mouse-button) on a part to focus the view on this part
Tab to toggle between 1st/3rd person view
If the actual focus isn't a camera, the game will choose one automatically for the 3rd person view. If the focused part is somehow connected to a bot with a camera, it will use this one, if not, it will take the next camera in the cam-cycle.
LeftShift + Tab to jump to the next camera in the cam-cycle
As you add new camera parts to the world, they will be added to the end of the cam-cycle. At the moment there is no other way to determine this sequence.
Rawbots has its own special ways to manipulate bot parts, which can be mastered with ease.
Quick-Spawn Parts
LeftCtrl + LMB on the ground (the planets surface or any world geometry) to quick-spawn parts
LMB + Drag a part, to grab and move it arround
The effective force depends on the current zoom distance
Basic Connection
Hold
"1" to start a step-by-step connecting operation (release "1" to cancel it)
Be sure to hold "1" and not "Num_1" on the num-pad!
LMB on a part to select part-1
It will be highlighted and a connection point will be shown.
RMB on part-1 to switch the connection point.
LMB on another part to select the part-2.
A preview of the result will be shown. To determine the used connection point on part-2, simply hover the one you would like to use with the mouse.
You may need to adjust your camera angle, which can still be done without releasing
"1".
RMB to rotate the preview.
You can still move to another connection point of part-2 after rotating
LMB on the preview will confirm the operation
Part-1 will be forced to move to its desired location on part-2 now.
In some cases this may fail because of different reasons.
You can not connect two parts of one and the same construction to each other with this operation.
The force is based on the orientation and distance of part-1 and -2 so replacing them before the operation may help.
If part-1 is not connected to any other parts, it will have no collision while it is forced to move to part-2.
The operation is completed as soon as both parts are stuck together. Release "1" before this is done to cancel it.
Voltaic Arcs Edit
These are distanced connections which can also be used to create supports in your constructions. It is done in much the same way as a basic connection.
Hold "2" to start a voltaic arc operation
LMB on a part to select part-1
RMB on part-1 to switch the connection point
LM on another part to select part-2
RMB on part-2 to switch the connection point
LMB the preview to confirm the operation
The arc will remeber the orientation and location of the parts, as they have been connected, and do its best to keep these.
If the operation fails, the points you tried to connect may be to far appart from each other.
The maximum range of a VA is 10 units of length (5 continuums).
Disconnect Parts
"0" + LMB on a part will break all its connections
Remove Parts
BackSpace + LMB on a part to permanently remove the part + all parts connected to it + their programs from your world
Just be carefull when using this combination
It's not confirmed yet, but it may be Delete instead of BackSpace on your keyboard.
There are many different names used for the world geometry, so i will use the expression world-hex for now. At the moment the only way to add new hexes is to "extend" from given ones. There are different styles and types of geometry which you can add.
Add Geometry
Hold "6"
A list of possible styles will apper on the right border of the screen
And hover a specific area of an already existing world-hex
A preview of the new geometry will be shown.
Some styles also have different types. These are for example the ramps.
- RMB on the preview to switch the type
LMB to place the selected geometry
Energy Bridges
Since blueshift 0.1.X we are again able to add energy bridges.
Hold "8"
and hover a specific area of a world-hex
A preview will be shown
Bridges can only be placed on specific areas like corners, side-faces, on the bottom...
RMB on the preview to rotate it
LMB to confirm
You can then edit the energy bridge via the visual programming
Remove Geometry
Hold "7"
and hover a player-added geometry
You can not remove prebuilt geometry right now.
LMB on the geometry to remove it
Since blueshift 0.1.X the blueprint feature is available for us the first time. It allows you to save bots in a file, which means a single bot (all parts need to be connected) and its program.
This blueprint can then easily inported to any existing rawbots world. This allows easy sharing your bots with other or simply dublicate them.
Create a blueprint
"4" + LMB on a bot
The console will be opened and you have to type a name for the new blueprint
Spawn blueprints
LeftCtrl + LeftShift + LMB on the grond
The console will be opened, showing a list of your saved bluprints
Tab/LeftShift + Tab to select the blueprint
Enter to confrim
Back to the world view a preview will be shown
LMB on the ground to spawn the bot
Share blueprints
The devs plan to create a market-place for sharing/trading blueprints easily with each other, but for now we have to transfer our blueprint-files directly.
The files are located in:
Windows: "C:\Users\USERNAME\Documents\rawbots\blueprints"
Mac / Linux: "~/rawbots/blueprints"
All files located there will be listed in the ingame blueprint list.
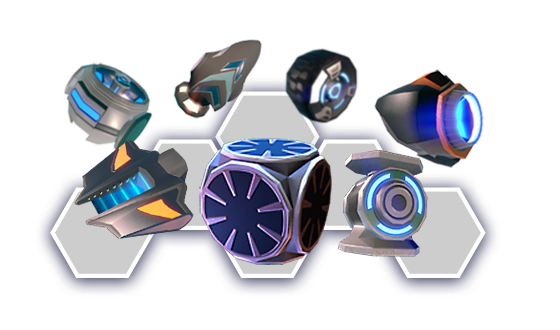
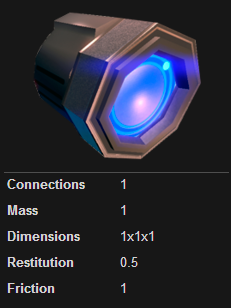
BOTS PARTS
BOTS PARTS
These are the parts to build your bots with. They all share the following inputs and outputs:
| Input/Output | Description | Data Type |
|---|---|---|
| >disconnect | If it changs to 1 the part loses all connections | decimal |
| > glow | Glow color | colorcode | > highlight | Highlight color | colorcode | > color_a | Primary color | colorcode | > color_b | Secondary color | colorcode | < part | Outputs a reference to this part | part |
This part allows you to have a view in the game. It also can detect parts inside an adjustable area in front of it and outputs a reference to the closest detected part.
Notice, a camera is not just to add eyes to your bots, it also works as an encapsulation of each bot's program. This is really needed to prevent overlaps of multiple input samplers key-press-detection.
For example, two ellbows in your world, listening to the "w/s" keys via two different input samplers in their visual program, will both react on these inputs, as long as they aren't related to a camera. This means, as soon as a part is related to a construction which contains at least one camera, it will be encapsulated from the rest of the world.
When pressing keys in this case, only these visual programs, which are related to the actual focused part/construction, will listen to these inputs.
There are cases, where parts aren't connected physically, but via their visual programming operands, which also counts as a "logic-connection" and therefor, they are also related to this encapsulated system.
| Input/Output | Description | Data Type |
|---|---|---|
| > near | Sets the field of vision's starting distance from the camera lens (0-200) | decimal |
| > far | Sets the field of vision's maximum distance from the camera lens (0-200) | decimal |
| > size | Highlight color | colorcode |
| > color_a | Sets the field of vision's width and height (0-100) | decimal |
| < activity | Gets the total number of parts detected within the field of vision | decimal |
| < detected | Gets the closest part reference within the field of vision | part |
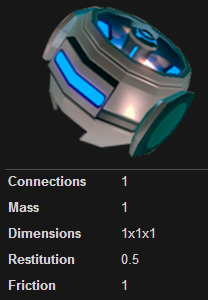
A basic structual part for building bots.
| Input/Output | Description | Data Type |
|---|---|---|
| > mass | Sets the mass (0-1000) | decimal |
| < mass | Gets the mass | decimal |
They act as a hinge, either allowing structures to bend freely, holding them at a given angle, or bending with a given velocity.
Elbows are capable of rotating through 180 degrees between +90 and -90, with 0 degrees being straight. Elbows behave very similarly to motors, the only difference being that their construction limits rotation to a 180 degrees cone.
If no
>angle or >velocity is set, the elbow will move freely.
Setting
>angle will cause the elbow to try and bend to an absolute angle.
However, elbows appear to operate on an internal controller to reach a set >angle. In earlier releases, that control may not provide enough torque to rotate under heavier loads. In this case, an external controller has been a good solution to modify the
>angle value until the effective reached the desired one.
Setting
>velocity will cause the elbow to try and bend at the given value in degrees per second.
Elbows can also be used to measure angle by reading
| Input/Output | Description | Data Type |
|---|---|---|
| > angle | Sets the speed of a constant bending | decimal |
| > velocity | Sets the desired angle of the elbow | decimal |
| < angle | gets the actual angle | decimal |
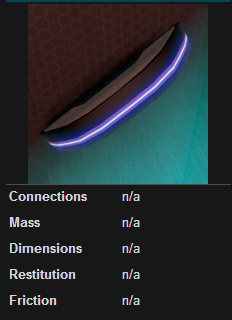
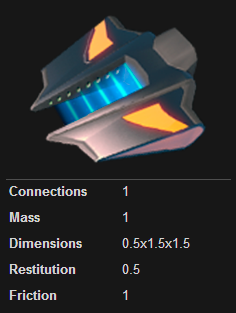
Since blueshift 0.1.X they can be added via terraforming. They can be used as bridges or also as doors as they will only extend while powered.
| Input/Output | Description | Data Type |
|---|---|---|
| > power | Numeric true or false to power or unpower | decimal |
| > length | Sets the length (0-40) | decimal |
| > width | Sets the width (0-30) | decimal |
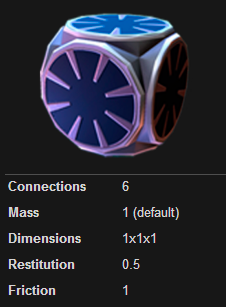
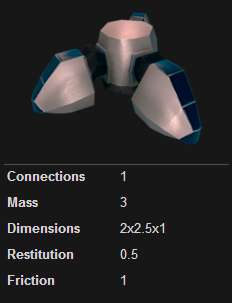
Light-weighted structural parts.
| Ext. Title | Ext. Cross | Ext. T | Ext. Elbow | Ext. Line |
|---|---|---|---|---|
| Connections | 6 | 5 | 4 | 2 |
| Mass | 0.3 | 0.3 | 0.3 | 0.3 |
| Dimensions | 3x3x1 | 3x2x1 | 2x2x1 | 3x1x1 |
| Restitution | 0.5 | 0.5 | 0.5 | 0.5 |
| Friction | 1 | 1 | 1 | 1 |
They work as airfoil surfaces, converting movement through water, air and space into a force perpendicular to the direction of motion and a drag force.
Similarly to an aircraft wing, the greater the angle between the fin and the air, the greater the perpendicular force and drag become.
Fins are commonly used to provide control over orientation to flying bots, as propeller blades or as dampeners against movement inertia.
| Input/Output | Description | Data Type |
|---|---|---|
| > capacitance | Maximum ? | decimal |
Provides upward force when placed in water. Can be used to keep a bot afloat.
| Input/Output | Description | Data Type |
|---|---|---|
| > capacitance | Maximum ? | decimal |
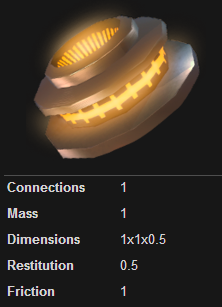
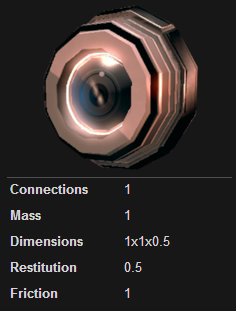
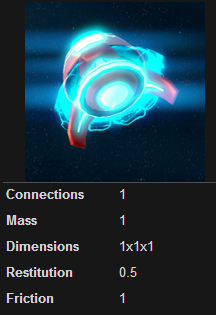
Continuously generates and stores energy which can be consumed by parts like plasma cannons.
Usage
A flux capacitor is used by linking its
with an energy consuming parts >energy_source in the visual programming screen. At the moment, they are not required to be physically connected with each other in order to work.
The higher its
>capacitance is set, the more energy can be stored, but there is a given maximum value and a constant charge rate.
The state of a capacitor can be seen by its glow. An unlit capacitor is empty, a flashing capacitor is charging, and a fully lit capacitor is charged. However, there is no way to determine the current ammount of stored energy yet
| Input/Output | Description | Data Type |
|---|---|---|
| > capacitance | Maximum ? | decimal |
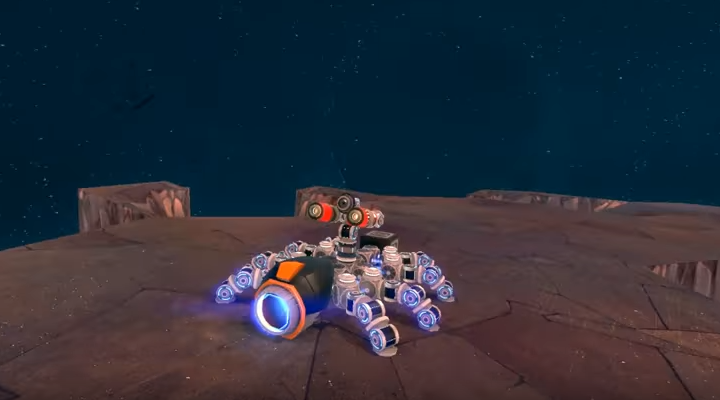
A very heavy part that can be used for stability on walking bots.
Its primary use is to attach it to the world geometry. It wont attach to other bot parts (may be changed in future build).
It also has the very usefull ability to meassure distances.
Imagine a laser-beam coming out of its 'mouth', it outputs the traveled distance until it hits a surface and also its angle relative to this surface.
| Input/Output | Description | Data Type |
|---|---|---|
| > attach | Numeric true or false; There is a max-distance on which hooks will attach | decimal |
| > attached | Outputs 1 if the hook is attached | decimal |
| < distance | The length of the 'imaginary beam'; Has a max-range | part |
| < angle | The angle of the 'imaginary beam' relative to the hit surface | p |
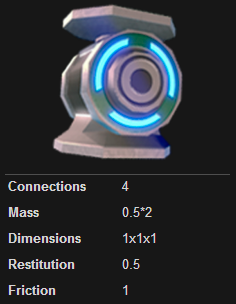
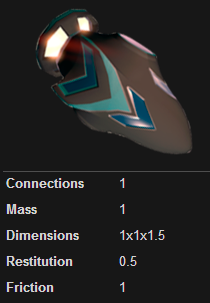
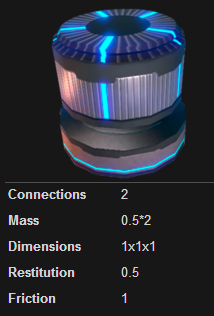
They operate similarly to jets, the key difference being that their thrust is always applied vertically upwards, regardless of their orientation, as long as they don't face downwards.
Hovers are used to provide lift for bots operating on the surface, in air or in space and will not operate in water (It may happen that they also wont work in space in future versions).
Usage
For positive values of
>lift, a proportional force will be exerted vertically upwards through the centre of the hover. Negative lift values will be ignored.Visually, hovers appear to have rotating blades and will expell a small cone of purple exhaust gasses, the size and intensity of which is dependent on the thrust (this will not damage any parts it touches).
The most common use for hovers is to provide lift for flying bots. Typicallly, lift values in the order of 100s are used for small to medium bots, but exact lift values and numbers of hovers required are highly situational. In most applications, multiple hovers are used, with a control system to keep the bot level.
| Input/Output | Description | Data Type |
|---|---|---|
| > lift | force that the hover will create | < decimal |
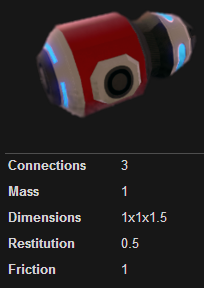
Used to provide thrust for bots operating in water. Hydro jets will not operate outside water. For the non-aquatic version, see jet.
For positive valeus of
>thrust, a proportional force will be exerted along the central axis of the jet. Negative thrust values will be ignored. Visually, jets will expell a short trail of bubbles, the size of which is dependent on the thrust value.
The most common use for jets is to provide forward thrust for water bots. In combination with a PID-control-system, they can also be used instead of floaters, because they also will balance the bot and allow to go underwater with ease.
Typicallly, thrust values in the order of 100s are used for propulsion is small to medium bots, but exact thrust values and numbers of jets required are highly situational.
Jets can also be used with lower thrust values to provide control over orientation and heading of submarine bots
| Input/Output | Description | Data Type |
|---|---|---|
| > thrust | Force that the jet will create | decimal |
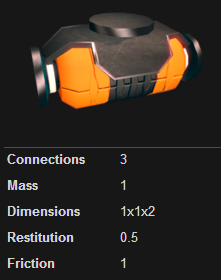
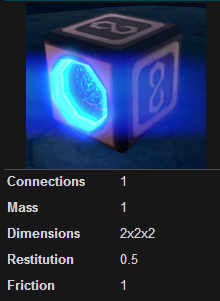
Can receive information from the hyperspace (see hypercube) to shoot out bot parts or smaller bots with a specific force.
| Input/Output | Description | Data Type |
|---|---|---|
| > force | Determines the force of the shot (0-1.000.000?) | part |
| > shoot | Fires the cannon when receiving hyperspace information (*rename to ">pipe" requested) | part |
| < shoot_force | The kinetic energy of the recently shot part as it has been expelled from the muzzle | decimal |
This part allows you to have a view in the game. It also can detect parts inside an adjustable area in front of it and outputs a reference to the closest detected part.
Encapsulation
Notice, a camera is not just to add eyes to your bots, it also works as an encapsulation of each bot's program. This is really needed to prevent overlaps of multiple input samplers key-press-detection.
For example, two ellbows in your world, listening to the "w/s" keys via two different input samplers in their visual program, will both react on these inputs, as long as they aren't related to a camera. This means, as soon as a part is related to a construction which contains at least one camera, it will be encapsulated from the rest of the world.
When pressing keys in this case, only these visual programs, which are related to the actual focused part/construction, will listen to these inputs.
There are cases, where parts aren't connected physically, but via their visual programming operands, which also counts as a "logic-connection" and therefor, they are also related to this encapsulated system.
| Input/Output | Description | Data Type |
|---|---|---|
| > Pop | Pops one of the stored parts/bots out in front of the cube on every change from true to false (first-in-first-out) | decimal |
| > Pipe_pop | Transfers one of the stored parts/bots through the pipe on every change from true to false (first-in-first-out) | decimal |
| < Pipe | Transferes information when activated and connected to a transceiver (e.g. hypercannon) | part |
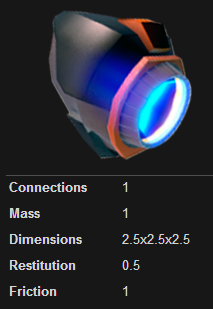
Used to provide thrust for bots operating on the surface, in air or in space. Regular jets will not opperate in water. For the aquatic version, see hydro jet.
For positive values of
>thrust , a proportional force will be exerted along the central axis of the jet. Negative thust values will be ignored. Visually, jets will expell a cone of purple exhaust gasses, the size and intensity of which is dependent on the thrust (this will not damage any parts it touches).
The most common use for jets is to provide lift and forward thrust for flying bots. Typicallly, thrust values in the order of 100s are used for propulsion for small to medium bots, but exact thrust values and numbers of jets required are highly situational.
As a primary source of lift, in many applications hovers may be a more suitable choice.
Jets can also be used with lower thrust values to provide control over orientation and heading of bots
| Input/Output | Description | Data Type |
|---|---|---|
| > thrust | Force that the jet will create | decimal |
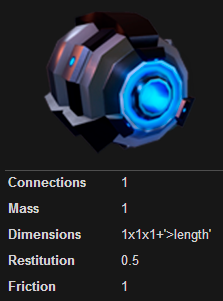
A laser is a melee weapon that can change its range by extending a laser beam on the opposite side of its connection point.
There is not much to tell about them, but they can cut most connections with a single touch and they also produce great "air-cutting" sounds.
| Input/Output | Description | Data Type |
|---|---|---|
| > length | Sets the length of the beam (0-5) | decimal |
| < length | Gets the current length of the beam | decimal |
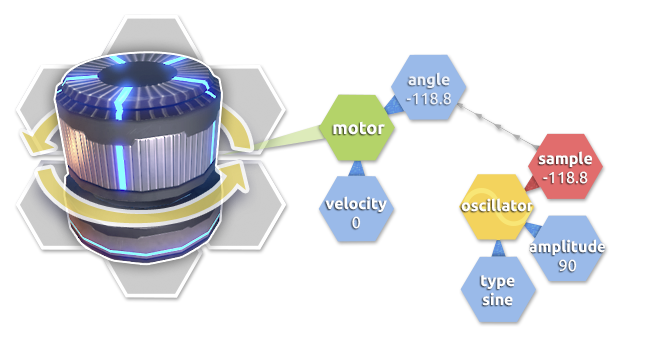
Used to create rotatable junctions.
Usage
Motors behave similarly to elbows, the key difference being their unrestricted movement, or with other words, to rotate continuously through a full 360 degrees.
If no
>angle or >velocity is set, the motor will move freely.
Setting an
>angle will cause the motor to try and bend to an absolute angle from -180 degrees to +180 degrees.
However, motors appear to operate on an internal controller to reach a set
>angle. In earlier releases, that control may not provide enough torque to rotate under heavier loads. In this case, an external controller has been a good solution to modify the >angle value until the effective reached the desired one.
Setting
>velocity will cause the motor to try and rotate at the given value in degrees per second.
The motor can also be used to measure angles by reading
| Input/Output | Description | Data Type |
|---|---|---|
| > angle | Sets the angle of the motor | decimal |
| > velocity | Sets the speed of a constant rotation | decimal |
| < angle | Gets the actual angle | decimal |
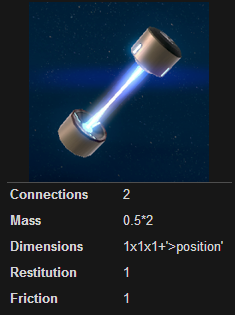
Used to create extendable junctions.
| Input/Output | Description | Data Type |
|---|---|---|
| > position | Desired position (0-3) | decimal |
| < position | Current actual position | decimal |
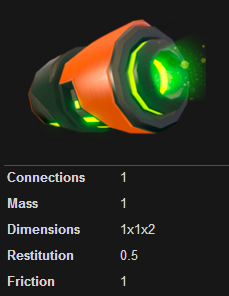
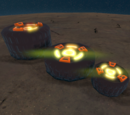
Consumes a flux capacitor's stored energy to shoot plasma orbs.
The way plasma projectiles behave depend on how much energy the plasma cannon receives from its energy source. This means that if it receives more energy it has a higher range and may deal more damage.
Each shot will completly empty the capacitor. If the capacitor isn't fully loaded, it will consume the already stored energy only, while there is a given minimum ammount of energy required before it is able to shoot again.
| Input/Output | Description | Data Type |
|---|---|---|
| > shoot | Fire onces, each time it's changed from false to true | decimal |
| > energy_source | Reference to the energy source (flux capacitor " | part |
| < shoot_force | The kinetic energy of the recently shot projectile as it has been expelled from the muzzle | part |

Emits a small amount of light in a spherical fashion.
| Input/Output | Description | Data Type |
|---|---|---|
| > color | Sets the color of light | colorcode |
| > intensity | The brightness of the light (0-1) | decimal |
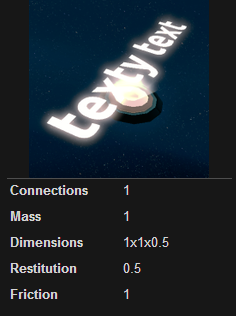
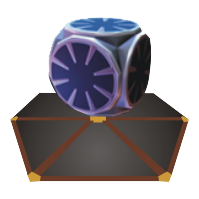
Used to display textures and labels.
Notice that the textures in the academy world are implemented videos (not animated images). The devs are working on a feature which allows projectors to display web-cam streams for example.
| Input/Output | Description | Data Type |
|---|---|---|
| > Intensity | 0-1 (0 will turn off the projector) |
decimal |
| > texture | Texture reference | texture |
| > label | Label reference | label |
Used to play sound samples.
(May also be used to play text-to-speech samples and microphone intputs in future versions)
Usage
Example of a valid sample:
The
>format needs to match the file's format, otherwhise it wont be handled correctly.
Samples can be played only once, on each false to true change of
>play, or in a loop, by setting it to -1.
| Input/Output | Description | Data Type |
|---|---|---|
| > source | Sample URL | string |
| > format | Supports .wav and .ogg only atm | enumeration |
| > volume | 0-1 | decimal |
| > play | Numeric true or false (-1 = loop) |
decimal |
Emits light in a cone.
| Input/Output | Description | Data Type |
|---|---|---|
| > Iris | Determines the cone's angle | decimal |
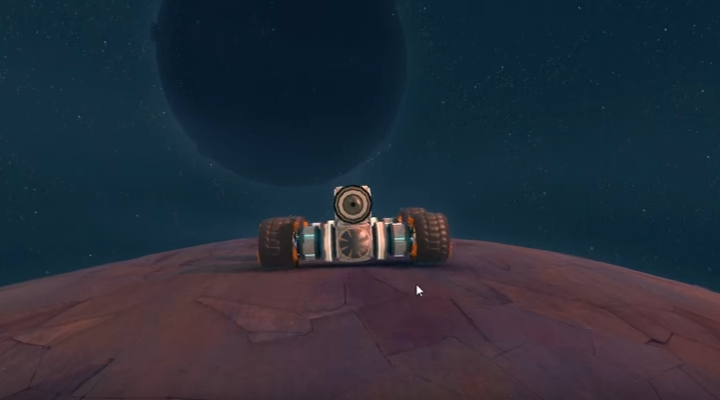
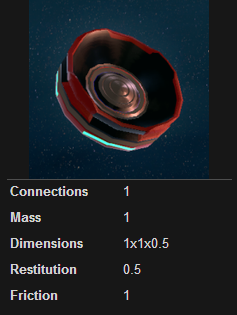
Primarily used for building vehicle based bots.
| Title | Wide Wheel | Wheel | Wide Wheel Small |
|---|---|---|---|
| Connections | 2 | 2 | 2 |
| Mass | 1 | 1 | 1 |
| Dimensions | 2x2x2 | 2x2x1 | 1x1x1 |
| Restitution | 0.5 | 0.5 | 0.5 |
| Friction | 5 | 5 | 5 |
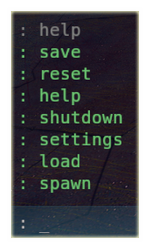
CONSOLE

CONSOLE
This is the place where you can use the command line to acces the system commands and where you can do the visual programming.
Esc to open and close the console
Command Line
That's the bottom line of the console. Above it you got a list of recently used commands.
(There exists a little issue atm after using Alt + Tab to get to the desktop. As you come back to the game, the console wont register your inputs like usual any longer. This is because it didn't catch the release of Alt and still belives it's pressed now. Hit Alt once again and it will be fixed)
Type a command and press Enter. If it is a known command, it will be written to the left side of colon. load : To make it easer to use, the game usually generates its sub-commands/entries and writes them to the right side of the colon.
load : stardust
Most commands contain multiple entries. In this case a list will be generated. Horzontal lines ( | ) are the seperators between each entry.
spawn : camera | continuum | elbow | fin | ...
You can now use Tab or LeftShift + Tab to jump to the next or previous entry, or delete the first entry and type it manually. Press Enter to confirm your selection. The game will take the expression between the colon and the first horizontal line only.
spawn : motor | continuum | elbow | fin | ...
In this case a motor will be spawned at the mouse pointer (if it hovers a legit spawn location).
With the Up/Down-Arrows you can iterate through recently entered commads
"help" shows a list of commands
"load" shows a list of worlds you can load
Since 0.0.11 the only world you can load is "stardust".
Load doesn't mean "load a savegame" it means "load the latest saved state of the specific world"
"save" saves the current state of the loaded world
Windows: "C:\Users\USERNAME\Documents\rawbots\defs"
Mac / Linux: "~/rawbots/defs"
The game creates a new savegame "[worldname]_[timestamp]" each time and also overwrites the '[worldname]' file, which is the default savegame and will be loaded with the command "load : [worldname]". For pre-built worlds, if you delete this file (maybe you had problems to load your default savegame), the game will generate a new one.
"reset" shows a list of savegames related to this world and will reset the world to this state.
"shutdown" exit the game
Without saving the last state!
"settings" shows the settings grid
There you can confrim your serial-key (0.0.9 only) and set the daytime of your world
"spawn" spawns bot parts at the mouse pointers location
The mouse needs to hover a planets surface or any world geometry.
A very handy way to spawn a big amount of one and the same part (in combination with Up-Arrow)
LeftCtrl + A moves the cursor to beginning of the command line
LeftCtrl + E moves the cursor to the end of the command line
LeftAlt + BackSpace deletes a word
LeftCtrl + U clears the command line
LeftCtrl + K deletes everything after the cursor position
LeftCtrl + L clears the list of recently used commands
VISUAL PROGRAMMING
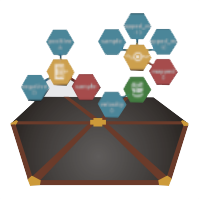
VISUAL PROGRAMMING
The background of the console is the place where you can breathe life into your creations.
Rawbots offers a collection of basic operands, which can be combined to complex and powerful programs.These hexagons have many different names, I will stick to the developers expression "tile". And for the console background I will use "grid".
The grid has a limited amount of space.
Hold MMB (middle-mouse-button) to drag/move arround the grid
MouseWheel Up/Down to zoom in/out
At the beginning the grid will be empty, so you wont see any changes.
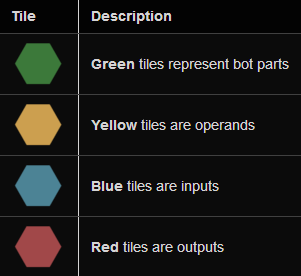
There are 4 different types of tiles, each has its own functionality
They are a logical representation of bot parts inside the console.
LMB on a bot part (through the background) to open its program
This will close the actual grid (if it doesn't already contain the clicked part's tile)
Beware! Many people have lost quite complex programs this way, because they had no connection to any other part tiles and therfor no chance to open them.
LeftShift + LMB on a bot part, to bring up its grid into the already opened grid
So this wont close the actual grid!
It may happen that tiles that have been placed in the same place are stacked/overlapped then.
Hover a part tile with the mouse to highlight the related part in the world
If the related part is out of sight, a green line of arrows will direct to it's location
There is a quite limited collection of pre-built visual programming operands. Each one represents a quite simple stand-alone function, but they can be combined to get much more complex ones. (Some day we may be able to take such combinations and define our own operands in a way)
LefCtrl + LMB on an empty space of the grid to add a new operand tile
These are the "connection points" between the operands. Inputs got the prefix ">", outputs "<".
LeftCtrl + LMB on a part/operand tile to add their inputs/outputs to the grid
To edit your programs, there are a couple of things you can do with each tile.
LMB + Drag a tile to move it arround on the grid
LMB on an input tile to enter its value//select its entry
Some input tiles have a list of given entries. They wont accept any other value than one of these entries.
- Tab or LeftShift + Tab to select an entry
- Enter to confirm
Some input tiles will kinda ignore player-typed values. For example the oscillators >time: If you enter a value into it, it will jump to the specific timeframe, but then it countinues to listen to its inner time. Such input tiles need to be "feeded" with output tiles to work correctly.
LeftCtrl + LMB + Drag an input tile on an output tile to a connection
You can also drag output tiles on input tiles.
Both, the input and output tile, need to be of the same data type. You can not, for example, connect a numeric input tile to a string based output tile.
At the moment known types are decimal, string, boolean, colorcode enumerations and part
While dragging tiles, you can still use the MMB to move the grid, if the destination tile is not on the screen
LeftCtrl + LeftShift + LMB on a tile to break its connections/remove it
If the clicked tile is an input/output tile with connections, the first click will break all its connections.
If the clicked tile is a part/operand tile it and all its input/output tiles will be removed, even if they are connected to other tiles!
You may encounter a strange behavour when deleting input tiles, if you already changed its value.
The game will remeber the changed value until you add the input tile again. When doing so, the value will be reset to its default.
LeftAlt + LMB on a tile to access its permissions
For example: Set "permission : -drag" on a part tile, and you wont be able to move the related bot part with your mouse any longer.
Tip: It is useful to set "permission : -delete" for at least one part of your bot to prevent it from accidentally deleting.
LeftAlt + LMB on a hex, to enter the passcode
To add a passcode, unzip the desired map/blueprint then open the file with a text editor.
Add this to the desired part/code hex without the parentheses:
(name)@(number) . passcode #0000
the passcode must be a four digits number.
Values lower or equal 0.5 are handled as False, values higher than 0.5 are True.
For example:
A multiplexer with a >selector value of 0.5 will still output >sample_a.
Above 0.5 it will output >sample_b.
VISUAL PROGRAMMING OPERANDS
VISUAL PROGRAMMING OPERANDS
These operands are used to breathe life into your creations via the visual programming.
Each one represents a quite simple stand-alone function, but they can be combined to complex and powerfull programs

Switches between differently typed input-groups when its selector value is incresed by more than 0.5.
If it is false, it will output the inputs with the suffix "_a"
If it is true, it will output the inputs with the suffix "_b"
| Input/Output | Description | Data Type |
|---|---|---|
| > selector | Determines which inputs will be output | decimal |
| > sample_a | These input-group will be output on a false selector value | decimal |
| > string_a | These input-group will be output on a false selector value | string |
| > color_a | These input-group will be output on a false selector value | colorcode |
| > part_a | These input-group will be output on a false selector value | part |
| > sample_b | These input-group will be output on a true selector value | decimal |
| > string_b | These input-group will be output on a true selector value | string |
| > color_b | These input-group will be output on a true selector value | colorcode |
| > part_b | These input-group will be output on a true selector value | part |
| < sample | The output value of each input-group | decimal |
| < string | The output value of each input-group | string |
| < color | The output value of each input-group | colorcode |
| < part | The output value of each input-group | part |

Switches between differently typed input-groups each time its selector value changes from false to true.
This is caused by a increse greater than .5 in the selector value.
By default it outputs group A.
At the first change from false to true the toggle will switch to group B.
Then the selector value has to become false again before it will be able
to switch back to group A on the next true input.
| Input/Output | Description | Data Type |
|---|---|---|
| > selector | Switches the outputted input-group on each true-phase | decimal |
| > sample_a | Input-group A (default) | decimal |
| > string_a | Input-group A (default) | string |
| > color_a | Input-group A (default) | colorcode |
| > part_a | Input-group A (default) | part |
| > sample_b | Input-group B | decimal |
| > string_b | Input-group B | string |
| > color_b | Input-group B | colorcode |
| > part_b | Input-group B | part |
| < sample | The output value of each input-group | decimal |
| < string | The output value of each input-group | string |
| < color | The output value of each input-group | colorcode |
| < part | The output value of each input-group | part |
Measures the acceleration of part_a along each of the 3 spatial axis, the pitch and roll angles and the acting gravity.
| Input/Output | Description | Data Type |
|---|---|---|
| > part_a | Reference to the part | part |
| > set_gyro | Resets the yaw axis | paryt |
| < gravity | Projected acceleration on the x axis | decimal |
| < accel_side | Projected acceleration on the x axis | decimal |
| < accel_front | Projected acceleration on the z axis | decimal |
| < accel_up | Projected acceleration on the y axis | decimal |
| < pitch | Angle on the x axis (jet-nose up/down) | decimal |
| < roll | Angle on the z axis (barrel-roll) | decimal |
| < yaw | Angle on the imaginary y axis (use >set_gyro to reset the axis) | decimal |
Switches between differently typed input-groups when its selector value is incresed by more than 0.5.
If it is false, it will output the inputs with the suffix "_a"
If it is true, it will output the inputs with the suffix "_b"
| Input/Output | Description | Data Type |
|---|---|---|
| > part_a | Part reference | part |
| < altitude | The distance from the planetary center to the referenced part | descimal |

Switches between differently typed input-groups when its selector value is incresed by more than 0.5.
If it is false, it will output the inputs with the suffix "_a"
If it is true, it will output the inputs with the suffix "_b"
| Input/Output | Description | Data Type |
|---|---|---|
| > part_a | Reference to the first part | part |
| > sample_b | Reference to the second part | part |
| < distance | Distance between the parts | decimal |

v0.0.11 of controller
A PID controller is a complex but powerful operand. It is used to reduce "error" values in control systems, driving the measured variable towards a specified setpoint.
| Input/Output | Description | Data Type |
|---|---|---|
| > feedback | The current value | decimal |
| > setpoint | The desired value | decimal |
| > kp | The proportional control part | decimal |
| > ki | The integral control part | decimal |
| > kd | The derivative control part | decimal |
| > reset | Resets the integral | decimal |
| < control | The calculated adjustment | decimal |
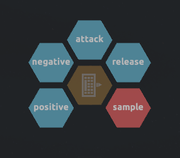
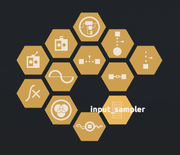
Catches keyboard-inputs to generate a signal.
The signal is ranged from negative 1 to positive 1 while its default value is 0
>positive and >negative can be set to (without double quotes):
Normal keys:
"a", "b", "c" ...
Number keys:
"1", "2", "3", ...
Arrow keys:
"up", "down", "left", "right"
Keypad keys:
"[1]", "[2]", "[3]", "[+]", "[equals]"
Modifier keys:
"right shift", "left shift", "right ctrl", "left ctrl", "right alt", "left alt", "right cmd", "left cmd"
Special keys:
"backspace", "tab", "return", "escape", "space", "delete", "enter", "insert", "home", "end", "page up", "page down"
Function keys:
"f1", "f2", "f3", ...
| Input/Output | Description | Data Type |
|---|---|---|
| > positive | Defines the key that is used to increase the output signal | string |
| > negative | Defines the key that is used to decrease the output signal | string |
| > attack | Alters how fast the output signal changes while a key is pressed | decimal |
| > release | Alters how fast the signal returns to zero while no key is pressed | decimal |
| < sample | The generated output signal | decimal |

Switches between differently typed input-groups when its selector value is incresed by more than 0.5.
If it is false, it will output the inputs with the suffix "_a"
If it is true, it will output the inputs with the suffix "_b"
| Input/Output | Description | Data Type |
|---|---|---|
| > selector | Determines which inputs will be output | decimal |
| > sample_a | These input-group will be output on a false selector value | decimal |
| > string_a | These input-group will be output on a false selector value | string |
| > color_a | These input-group will be output on a false selector value | colorcode |
| > part_a | These input-group will be output on a false selector value | part |
| > sample_b | These input-group will be output on a true selector value | decimal |
| > string_b | These input-group will be output on a true selector value | string |
| > color_b | These input-group will be output on a true selector value | colorcode |
| > part_b | These input-group will be output on a true selector value | part |
| < sample | The output value of each input-group | decimal |
| < string | The output value of each input-group | string |
| < color | The output value of each input-group | colorcode |
| < part | The output value of each input-group | part |

Performs a logical operation on one or two logic inputs and produces a single logic output.
| Input/Output | Description | Data Type |
|---|---|---|
| > in_a | Numeric true or false input | decimal |
| > in_b | Numeric true or false input | decimal |
| > type | See table of logic operations below | enumeration |
| < out | Numeric true or false output | decimal |
Logic Operations (NOT ignores B)
| A | B | NOT | AND | NAND | OR | NOR | XOR | XNOR |
|---|---|---|---|---|---|---|---|---|
| 0 | 0 | 1 | 0 | 1 | 0 | 1 | 0 | 1 |
| 1 | 0 | 0 | 0 | 1 | 1 | 0 | 1 | 0 |
| 0 | 1 | 1 | 0 | 1 | 1 | 0 | 1 | 0 |
| 1 | 1 | 0 | 1 | 0 | 1 | 0 | 0 | 1 |

Math Function v0.0.11
Performs different mathematical operations on two input values.
| Input/Output | Description | Data Type |
|---|---|---|
| > in_a | Input value a | decimal |
| > in_b | Input value b | decimal |
| > type | Defines which operation will be performed | enumeration |
| < out | Output value | decimal |
math operations (
some operations ignore in_b).
| Type | Operation | Description |
|---|---|---|
| ADD | Addition | a + b |
| SUBS | Subtraction | a - b |
| MULT | Multiplication | a * b |
| DIV | Division | a / b |
| ADD | Addition | a + b |
| MOD | Modulo | Finds the remainder of division of one number by another |
| SIN | Sine | sin a |
| SIN | Sine | sin a |
| COS | Cosinus | cos a |
| TAN | Tangent | tan a |
| SQR | Square root | √ a |
| ABS | Absolute value | |a| |
| MIN | Min value | Outputs the lower value of a and (useful as a max-cap) |
| MAX | Max value | Outputs the lower value of a and (useful as a min-cap) |
| POW | Power | a ^ b |
| EXP | Exponent | exp a |
| LOG | Logarithm | log a |
| CEIL | Ceiling | ⌈a ⌉ |
| FLOOR | Floor | ⌊a⌋ |
| ROUND | ROUND | The ordinary rounding of
a to the nearest integer [a] |
| SIGN | Sign |

Generates oscillated output signals.
Alternative Time Input
The >time input allowes to override the inner clock of the oscillator.
If it is not set, the inner clock runs in a 0 to 1 loop, but as soon as it is connected to an output it will ignore the inner clock and listen to the input value. If this value is outside the 0-1 range, it will be converted (modulo), which means a >time value of 2.25 would be converted to 0.25. The oscillator now constantly outputs the value which it generates at 1/4 of its full cycle.
This offers a great span of applications. For example, the >time could be connected to an input sampler's
Another common use for >time is to syncronize two or more oscillators. This could be done by setting up an oscillator with ">type Sawtooth" and ">amplitude .5" (Other inputs remain default). This "clock" will now generate a consistent -0.5 to 0.5 looped signal (starting at 0). Connected to the >time inputs of the oscillators which should be syncronized, will ensure that they do so.
That's also the moment where >phase becomes of interest, as it is able to add an offset to the >time. If one of the syncronized oscillators should be 1/4 cycle ahead the others, its >phase needs to be set to 0.25 (-0.75 would be the same).
| Input/Output | Description | Data Type |
|---|---|---|
| > time | Overrides the use of the internal clock (wont work correctly if not connected to an output) | decimal |
| > time_scale | not confirmed yet (seems not to work atm) | decimal |
| > amplitude | The peak value of the signal either side of zero, assuming no offset is applied | decimal |
| > frequency | The number of cycles that the output signal passes through each second | decimal |
| > phase | Determines how far into a cycle the oscillator will start (time offset) | decimal |
| > offset | Offsets the signal value | decimal |
| > type | Determines the output waveform | enumeration |
| > invert | Determines whether the output waveform is inverted | boolean |
| < sample | The oscillated signal | decimal |

Used to scale, offsets and/or invert decimal values.
They are mostly used to scale input sampler outputs
| Input/Output | Description | Data Type |
|---|---|---|
| > sample | The input value | decimal |
| > sample_min | The lower and upper borders to specify the sample range | decimal |
| > sample_max | The lower and upper borders to specify the sample range | decimal |
| > mapped_min | The lower and upper borders to specify the mapped range | decimal |
| > mapped_max | The lower and upper borders to specify the mapped range | decimal |
| > sample_b | These input-group will be output on a true selector value | decimal |
| > invert | Flips | boolean |
| < mapped | The scaled output value | decimal |
| < inverted | The inverted scaled output value | decimal |
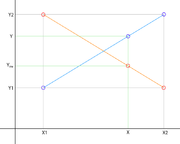
Sample mapper applies linear interpolation between two points: (sample_min; mapped_min) and (sample_max; mapped_max).
Used to set up textures to be used with projectors (and maybe others in future builds)
| Input/Output | Description | Data Type |
|---|---|---|
| > url | Link | string |
| > width | not implemented yet? | decimal |
| > height | not implemented yet? | part |
| > position | [x,y,z] while each axis accepts -1, 0 or 1 only | 3X coordinate |
| < texture | Texture reference | texture |

Switches between differently typed input-groups when its selector value is incresed by more than 0.5.
If it is false, it will output the inputs with the suffix "_a"
If it is true, it will output the inputs with the suffix "_b"
| Input/Output | Description | Data Type |
|---|---|---|
| > part_a | Reference to the part | part |
| < v_side | linear velocities | decimal |
| < v_front | linear velocities | decimal |
| < v_up | linear velocities | decimal |
| < w_side | angular velocities | decimal |
| < w_front | angular velocities | decimal |
| < w_up | angular velocities | decimal |